
Lawn
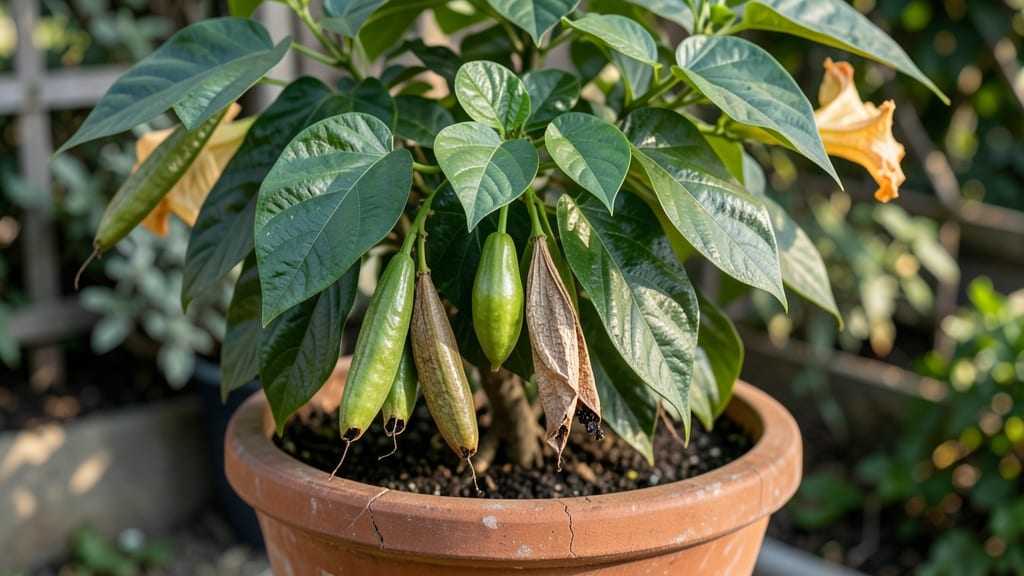
Cold-stratifying Brugmansia seed pods unlocks the secret to growing these stunning, fragrant plants from scratch—something I perfected after struggling with store-bought seedlings that never bloomed. 🌱 The key isn't just tossing seeds in soil; it's mimicking nature's winter chill to break dormancy, which can take weeks but guarantees stronger, more reliable plants.
Harvesting those leathery, football-shaped pods in late fall is half the battle. Inside, you'll find flat, brown seeds that need 6-8 weeks of refrigeration in slightly damp paper towels to soften and sprout.
Skipping this step means waiting months—or never seeing germination. I've tried planting them fresh, and it's a gamble.
Once stratified, those seeds burst into life with tiny, fuzzy leaves that'll have you hooked. Within 8-12 weeks, you'll be transplanting sturdy seedlings ready to handle your climate's heat or humidity.
The payoff? Plants that bloom earlier and more prolifically than nursery starts, with that signature Brugmansia perfume filling your garden.
This method works for any Brugmansia type—whether you're growing the towering 'Angel's Trumpet' or the compact 'Pink Trumpet'. The only catch? Patience. But trust me, the first time you see those trumpet-shaped blooms, you'll forget the wait. Let's get those seeds sprouting!
📚 In This Guide
- What you need
- Instructions
- Tips and common mistakes
- Wrapping up and next steps
What you need
- ● Mature brugmansia seed pods – Harvest fresh or dried pods (ensure they’re fully ripe and slightly wrinkled). Quantity: 5–10 pods per batch.
- ● Potting mix – Use a well-draining, sterile mix (e.g., 50% peat moss, 30% perlite, 20% coco coir). Quantity: 1–2 gallons.
- ● Small pots or seed trays – 2–4 inch pots or trays with drainage holes. Quantity: 1 per 2–3 pods.
- ● Ziploc bags or plastic wrap – For humidity retention during stratification.
- ● Refrigerator or cold frame – Must maintain 35–45°F (2–7°C) for 4–8 weeks.
- ● Pruning shears or knife – To carefully open pods and extract seeds.
- ● Spray bottle – For misting soil (keeps it moist but not soggy).
- ○ Grow lights or sunny windowsill – Optional: For post-stratification warmth (12+ hours of light/day).
- ○ Heat mat (optional) – Speeds up germination if kept at 70–75°F (21–24°C) after stratification.
- ● Label markers – To track seed varieties and planting dates!
Step-by-step instructions for cold-stratifying Brugmansia seed pods
Here's how I've perfected reliable germination—no more waiting years for blooms.
🌱 Step 1: Harvest and Extract Seeds from Ripe Pods
Collect fully mature pods when they turn brown and begin splitting open naturally. Brugmansia seeds are encased in a gelatinous coating that protects them but also slows germination. I wear gloves when handling them—the seeds contain mild toxins that can irritate skin.
Slice open the pods lengthwise with a sterilized knife and scoop out the seeds with a spoon. Place them in a bowl of cool water to separate the seeds from the pulp. The viable seeds will sink immediately, while empty or non-viable ones will float. Discard the floating seeds and rinse the good ones thoroughly under running water.
💧 Step 2: Prepare the Cold Stratification Medium
Moisten a mixture of equal parts peat moss and perlite until it's damp but not soggy—think of a wrung-out sponge. This blend provides both moisture retention and aeration, which is critical for preventing rot during stratification. Brugmansia seeds need consistent moisture but will drown in waterlogged conditions.
Sterilize your growing tray or container with a 10% bleach solution (1 part bleach to 9 parts water) and rinse thoroughly. This prevents fungal infections that can wipe out your seeds during the cold period. I use small plastic seedling trays with clear lids to monitor moisture levels without disturbing the seeds.
❄️ Step 3: Stratify Seeds in the Refrigerator
Spread the cleaned seeds evenly across the prepared medium, spacing them about ½ inch apart to prevent crowding. Cover them with a thin layer—just enough to obscure their color—of the same peat-perlite mix. Brugmansia seeds require 90-120 days of cold stratification at 35-40°F to break dormancy.
Place the tray in a sealed plastic bag with a few small holes poked for airflow, then store it in the refrigerator's crisper drawer. Check the moisture weekly—if the mix feels dry to the touch, mist lightly with water. Overwatering here is the fastest way to lose your seeds to mold.
☀️ Step 4: Transition to Warm Germination Conditions
After the full stratification period, remove the tray from cold storage and place it in a warm, bright location. Brugmansia seeds need 70-75°F soil temperatures to germinate. I use a seedling heat mat set to 75°F under the tray to maintain consistent warmth—this cuts germination time from weeks to days.
Keep the medium consistently moist but never waterlogged. Germination typically begins in 7-21 days, though some seeds may take longer. You'll see the first sign of life when tiny white roots emerge from the seeds, followed by the shoot breaking through the soil surface.
🌿 Step 5: Provide Optimal Growing Conditions for Seedlings
Once seedlings emerge, remove the plastic lid to prevent damping-off disease. Brugmansia seedlings are delicate and need bright, indirect light initially to prevent leggy growth. I use a grow light on a 14-hour daily cycle positioned 4-6 inches above the seedlings.
When the first true leaves appear (not the initial seed leaves), transplant each seedling into its own 3-inch pot with fresh potting mix. Brugmansia seedlings are sensitive to root disturbance, so I use a dibble or pencil to create planting holes rather than digging with my fingers.
Tips & tricks for perfect Brugmansia germination
Here's what nobody tells you about getting those stubborn seeds to sprout reliably.
Timing is Everything: The 90-120 days of cold stratification at 35-40°F is non-negotiable for Brugmansia seeds. I learned this the hard way after trying to rush the process—seeds that didn't get enough cold time either failed to germinate or produced weak seedlings. Mark your calendar when you start stratification to track the full period accurately. If you're impatient, consider using a temperature-controlled seed fridge that maintains consistent 38°F conditions.
Medium Matters: That equal parts peat moss and perlite mix isn't just arbitrary—peat holds moisture while perlite provides essential aeration. I've tried coconut coir alone and found it holds too much moisture, leading to mold. For better drainage, consider adding a thin layer of vermiculite on top of your medium after planting seeds. This helps regulate moisture during the critical cold period without disturbing the seeds.
Visual Cues for Success: In Step 4, watch for those tiny white roots as your first sign of life—this means germination is underway. The shoot breaking through the soil surface usually follows within days. If you're using clear lids on your seedling trays, you'll see condensation forming on the inside. This is normal and indicates proper humidity levels during the warm germination phase. If condensation disappears completely, it's time to mist the medium lightly.
Safety First: Brugmansia seeds contain mild toxins that can irritate skin, so always wear gloves during handling. I also recommend working in a well-ventilated area when opening pods—the seeds release a faint but noticeable scent that some people find unpleasant. For extra protection, consider wearing a dust mask when processing large quantities of seeds to avoid inhaling any fine particles.
Pro Tips for Brugmansia Seed Pods
- Here's what nobody tells you about getting those stubborn seeds to sprout reliably.
- Timing is Everything: The 90-120 days of cold stratification at 35-40°F is non-negotiable for Brugmansia seeds. I lea...
- Medium Matters: That equal parts peat moss and perlite mix isn't just arbitrary—peat holds moisture while perlite pro...
Frequently asked questions
Got questions about brugmansia seed pods? You’re not alone! Whether you’re a first-time gardener or a seasoned plant enthusiast, these common concerns can help you navigate germination, care, and troubleshooting with confidence. Let’s dive in!
Are brugmansia seed pods easy to germinate?
Brugmansia seeds are notoriously tricky—especially without cold stratification. Most seeds need 60–90 days in the fridge (35–45°F) to break dormancy. Even then, germination rates hover around 50–70%. Patience and consistency are key! For faster results, try soaking seeds in warm water for 24 hours before stratifying.
How long does it take for brugmansia seed pods to sprout?
After cold stratification, expect sprouts in 2–8 weeks, depending on temperature and moisture. Keep soil warm (70–80°F) and humid—use a heat mat or greenhouse tray if needed. If nothing emerges after 8 weeks, the seeds may be non-viable. Don’t give up; try a fresh batch!
Can I use brugmansia seed pods from my garden?
Collect mature pods (they’ll turn brown and papery), crack them open to extract seeds, and clean them gently. Store seeds in a paper towel in the fridge until you’re ready to stratify. Pro tip: Label seeds by parent plant to preserve desirable traits (like color or fragrance).
What if my brugmansia seeds rot during stratification?
Rotting usually means too much moisture or poor airflow. To prevent this:
If rot happens, try drying seeds slightly before restarting stratification.
Are there alternatives to growing brugmansia from seed?
Yes! If seeds feel too finicky, consider:
- Cuttings: Brugmansia roots easily from semi-hardwood cuttings in spring/summer.
- Layering: Bend a low branch to the ground, cover with soil, and wait for roots.
- Layered nurseries: Buy young plants from reputable growers for instant blooms.
Wrapping up and next steps
Mastering the art of brugmansia seed pod germination through cold stratification unlocks a world of vibrant blooms and lush foliage—without the guesswork! 🌱 By following this blueprint, you’ve gained the confidence to nurture these stunning plants from seed, ensuring healthy starts and thriving gardens.
Now, take that knowledge and grow with purpose—whether you’re expanding your collection, sharing seeds with fellow plant enthusiasts, or simply enjoying nature’s beauty.
Your next step? Plant those prepped seeds and watch your garden transform! For extra inspiration, explore brugmansia care tips or join gardening communities to swap stories and tricks. Happy growing! 🌸