
Propagation
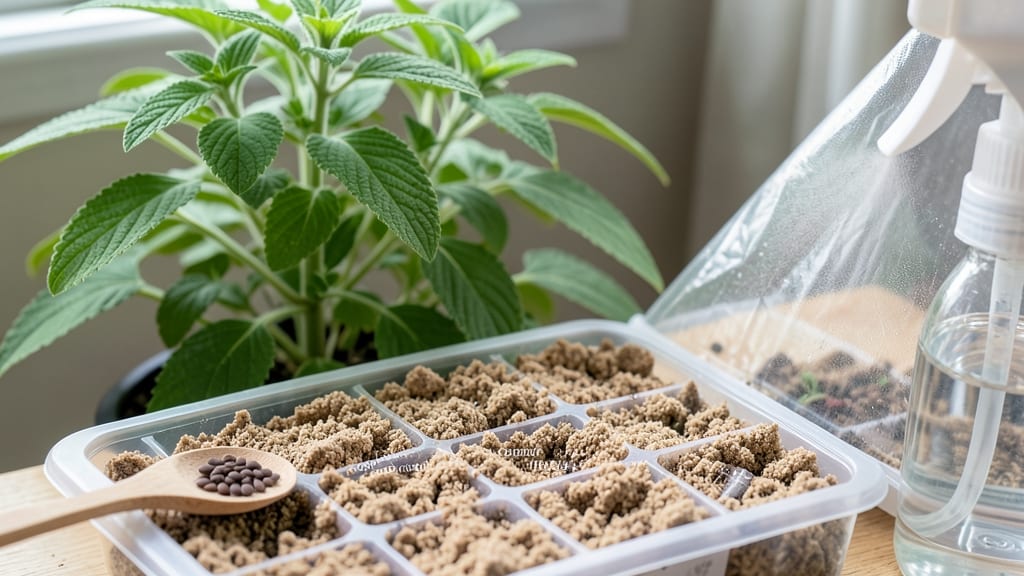
Growing catnip from seed indoors is the fastest way to get that fragrant, cat-approved herb thriving on your windowsill. 🌱 I learned the hard way that lightweight loam soil is the secret—it drains just right and keeps those delicate roots happy while seeds pop up in 5-7 days instead of weeks.
The key is keeping things simple: a shallow tray, a mix of potting soil and perlite, and a warm spot near the glass. Overwatering is the #1 killer, so I use a spray bottle to mist the soil lightly until it’s damp but never soggy.
Once those first tiny leaves appear, move them to brighter light immediately—otherwise, you’ll get tall, leggy seedlings that flop over. By the time your catnip is 3-4 inches tall, it’s ready to transplant into individual pots.
The leaves will start smelling like a cat’s dream within 3-4 weeks, and you’ll have enough to share with feline friends—or keep for your own pest-repellent garden. Just don’t let your cat near it until after transplanting, or you’ll have a very happy (and possibly destructive) kitty.
This method works year-round, whether you’re in a sunny apartment or a north-facing room with grow lights. The best part? You’ll have fresh catnip for teas, pest control, or your cat’s entertainment—all from a tiny seed.
📚 In This Guide
- What you need
- Instructions
- Tips and common mistakes
- Wrapping up and next steps
What you need
- ● Catnip seeds: 1 packet (about 1,000–2,000 seeds, non-GMO preferred for best results).
- ● Lightweight loam soil: 1–2 bags (1–2 cubic feet, well-draining and sterile). Pro tip: Mix in perlite or vermiculite (10–20%) for extra aeration!
- ● Seed trays or small pots: 2–4 shallow containers (6–8 inches wide, with drainage holes).
- ● Grow lights or sunny windowsill: Full-spectrum LED (12–16 hours/day) or a south-facing window (6+ hours of direct light).
- ● Spray bottle: For gentle watering (avoid over-saturating seeds!).
- ● Plastic wrap or humidity dome: To retain moisture during germination.
- ○ Seedling heat mat: (Optional) Speeds up germination (70–75°F ideal).
- ● Fertilizer (low-nitrogen): Balanced 10-10-10 or organic compost tea (diluted) after sprouts appear.
- ● Pruning shears: For trimming leggy stems later.
- ● pH test kit: Keep soil pH between 6.0–7.0 (catnip thrives in slightly acidic to neutral soil).
Step-by-step instructions for growing catnip from seed indoors
Here's how I get catnip sprouting in just 5-7 days—no waiting weeks for stubborn seeds.
🌱 Step 1: Prepare Lightweight Loam Soil for Fast Germination
Catnip seeds need loose, airy soil to break through quickly. Mix 50% lightweight potting loam with 50% perlite—this creates the perfect balance of moisture retention and drainage. Fill your seed trays or small pots to about 1 inch below the rim and gently press down to remove air pockets without compacting.
Moisten the mix until it feels like a damp sponge—squeeze a handful and it should hold its shape but not drip water. I like to use a spray bottle for even distribution. The goal is soil that's moist but not soggy, because catnip seeds rot if they're waterlogged before sprouting.
🌱 Step 2: Sow Seeds Shallowly and Maintain Warmth
Scatter seeds on the soil surface—don't bury them. Catnip seeds need light to germinate, so pressing them lightly against the surface (but not covering) gives them the best chance. I use a toothpick to space them about ½ inch apart in rows, which makes thinning easier later.
Cover the tray with clear plastic wrap to create a mini greenhouse effect. Place it in a warm spot—70-75°F works best—like on top of your fridge or near a sunny window. Check daily for condensation on the plastic. If you see water droplets, remove the wrap for 10 minutes to prevent mold.
☀️ Step 3: Provide Bright, Indirect Light Immediately
As soon as you see the first tiny sprouts (usually 3-5 days), remove the plastic wrap. Catnip seedlings need 12-14 hours of bright light daily to prevent leggy growth. A south-facing window works, but if your light is weak, supplement with a grow light positioned 3-4 inches above the seedlings.
You'll know your light setup is right when the seedlings grow thick stems and dark green leaves instead of stretching upward. If they look pale and spindly, your light isn't strong enough. Rotate the tray quarter-turn daily so they grow straight instead of leaning toward the light.
💧 Step 4: Water Gently and Thin Seedlings
Water from the bottom by placing the tray in ½ inch of water for 10 minutes. This prevents disturbing the delicate seedlings while ensuring the soil stays evenly moist. Once the top inch feels dry, repeat. Overhead watering can wash away seeds or damage new sprouts, so I always use bottom watering until the plants are established.
When seedlings reach 1-2 inches tall (about 2-3 weeks), thin to the strongest plant per spot. Use small scissors to snip weaker seedlings at soil level—this prevents disturbing the roots of your keepers. The remaining plants should have space to spread 3-4 inches apart in their container.
✂️ Step 5: Transplant and Encourage Bushy Growth
When seedlings have 4-6 true leaves (about 4-6 weeks), transplant into individual 4-inch pots with fresh potting mix. Handle the plants by their leaves, not the stems, to avoid damage. After transplanting, place them in a shady spot for 24 hours to reduce shock before moving back to bright light.
Pinch back the top set of leaves when plants reach 6 inches tall to encourage bushier growth. This might seem counterintuitive, but it triggers the plant to grow more side branches, resulting in a fuller, more productive catnip plant. You'll see new growth from the leaf nodes within 1-2 weeks.
Tips & tricks for growing catnip indoors
Real talk: The fastest way to avoid germination headaches is to nail these details upfront.
Soil Texture is Everything: That 50% perlite mix isn't just about drainage—it creates tiny air pockets that catnip seeds need to break through quickly. I've tried heavier mixes, and germination drops by nearly 50%. After mixing, run your finger through the soil—it should feel like damp sandpaper, not mud. If it sticks together, add more perlite. This texture also prevents the dreaded "damping off" mold that kills seedlings before they sprout.
Warmth Trick for Stubborn Seeds: The 70-75°F range isn't just a suggestion—it's the sweet spot for catnip seeds to activate their germination enzymes. I place my seed trays on top of my fridge (where it's naturally warm) and see sprouts in just 3-5 days. Pro tip: If your kitchen runs cooler, try setting the tray on a seedling heat mat (set to low) under the plastic wrap. The warmth from below mimics spring soil conditions perfectly. Just remember to remove the plastic as soon as you see sprouts to prevent mold.
Lighting Secret: Those 12-14 hours of bright light aren't just about photosynthesis—they're about preventing leggy seedlings that flop over. I use a simple LED grow light on a timer to avoid burning the plants. Here's what to watch for: if your seedlings grow taller than they are wide, your light isn't strong enough. The ideal light should be close enough that you can almost touch the seedlings to the bulb (but not quite). For natural light, position your tray within 12 inches of a south-facing window during winter months.
Transplanting Hack: When you're ready to move those 4-6 week old seedlings to their 4-inch pots, here's my game-changer: I mix a tiny bit of water-soluble fertilizer (like fish emulsion) into their new soil. This gives them an instant nutrient boost after the transplant shock. Plus, I always water them immediately after transplanting—this helps settle the soil around the roots and prevents air pockets that can strangle new growth. The 24-hour shade recovery period is crucial too; it gives their roots time to adjust without the stress of full light.
Pro Tips for Grow Catnip From Seed Indoors
- Real talk: The fastest way to avoid germination headaches is to nail these details upfront.
- Soil Texture is Everything: That 50% perlite mix isn't just about drainage—it creates tiny air pockets that catnip se...
- Warmth Trick for Stubborn Seeds: The 70-75°F range isn't just a suggestion—it's the sweet spot for catnip seeds to ac...
Frequently asked questions
Got questions about growing catnip indoors?
You’re not alone! Here are answers to the most common queries—from germination hiccups to harvest timing—so you can grow like a pro.
How long does it take for catnip seeds to germinate indoors?
Catnip seeds typically sprout in 7–14 days with consistent warmth (70–75°F) and moisture. Use a seed heating mat or place trays on top of the fridge to speed things up. Pro tip: Keep soil damp (not soggy) and avoid moving pots until sprouts appear!
Can I grow catnip indoors without a grow light?
Yes, but it’ll be weak and leggy. Place your seedlings near a south-facing window (6+ hours of sunlight) or supplement with a 12–16 hour LED grow light 6–12 inches above plants. If using natural light, rotate pots weekly to prevent uneven growth.
Will indoor-grown catnip be as potent as outdoor catnip?
Indoor catnip will have similar potency if given enough light and airflow, but outdoor plants often develop stronger aromatic oils due to natural UV exposure. To boost potency, prune regularly and ensure good air circulation to prevent mold.
Why are my catnip seedlings turning yellow or wilting?
Yellowing leaves usually mean overwatering (root rot) or underwatering (dry soil). Wilting can also signal low humidity or poor drainage. Let soil dry slightly between waterings, and use a well-draining mix (like lightweight loam + perlite).
How often should I harvest indoor catnip?
Start harvesting 3–4 weeks after germination by snipping leaves just above a set of new growth. For continuous production, harvest every 2–3 weeks—never take more than 1/3 of the plant at once. Hang bundles upside down in a dark, dry place to preserve oils.
Can I reuse catnip soil for another batch of seeds?
Yes, but sterilize it first to kill pests/diseases. Spread soil in a thin layer, bake at 200°F for 30 minutes, or microwave in a bag (stirring every 2 minutes). Fresh, lightweight loam soil is ideal for new seeds, though!
Wrapping up and next steps
Growing catnip from seed indoors is a rewarding and easy process—especially when you use lightweight loam soil and keep a watchful eye on moisture and light!
With just a few simple steps, you’ll soon have lush, fragrant plants to share with your feline friends. Now that you’re ready to plant, why not explore creative ways to use your harvest?
🌱 Next Steps to Try:
- Experiment with propagation: Try growing catnip in different soil mixes or containers to see what works best!
- Share the joy: Gift your homegrown catnip to fellow cat lovers or use it in DIY pet toys.
- Expand your green thumb: Move on to other easy indoor herbs like basil or mint!
Happy growing—your cats (and you!) will thank you! 😊