
Propagation
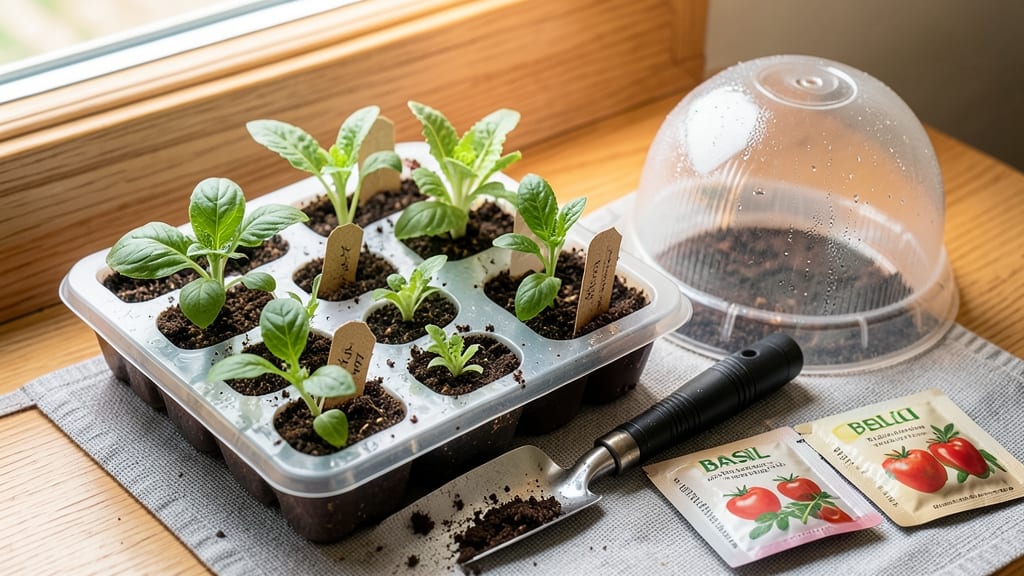
Plastic seed starting trays turn weak, leggy seedlings into sturdy, thriving plants—without the fuss of complicated setups. 🌱 I’ve used them for years, and they’ve cut my transplant shock by half while keeping costs low.
The secret lies in their simplicity: consistent moisture, perfect drainage, and just the right amount of root space to prevent crowding. Cell trays are my go-to because they mimic individual pots, making transplanting a breeze. Flat trays work too, but they require more attention to spacing and thinning.
Both types come in reusable or disposable versions, and you can even find ones with built-in saucers to catch excess water. The key is choosing trays with drainage holes—no holes mean soggy roots and moldy seedlings.
Once your seeds germinate, you’ll notice stronger stems and deeper green leaves compared to crowded or overwatered starts. The trays keep soil temperatures stable and protect delicate seedlings from drafts. By the time you’re ready to transplant, your seedlings will be ready to hit the ground running.
For beginners, plastic trays eliminate the guesswork of soil depth and spacing. They’re lightweight, stackable, and easy to clean between seasons. If you’ve ever struggled with leggy seedlings or weak transplants, these trays are your solution—simple, effective, and foolproof.
📚 In This Guide
- What you need
- Instructions
- Tips and common mistakes
- Wrapping up and next steps
What you need
- ● Plastic seed starting trays: 1–2 trays (1020-cell or 72-cell trays are ideal for small seeds; 288-cell trays work for tiny seeds like lettuce or herbs).
- ● Seed starting mix: 1–2 bags (sterilized, peat-free, or coco coir-based mix for best drainage and aeration). Pro tip: Avoid garden soil—it’s too dense!
- ● Seeds: Your chosen variety (check seed packets for spacing recommendations).
- ● Doming lid or plastic wrap: 1 (to retain humidity during germination).
- ● Spray bottle: 1 (for gentle watering to avoid disturbing seeds).
- ● Tray base or saucer: 1 (to catch excess water and prevent root rot).
- ● Grow lights or sunny windowsill: 1 (LED grow lights are ideal; 12–16 hours of light daily).
- ● Heat mat: 1 (for faster germination of slow starters like tomatoes or peppers).
- ● Humidity dome with vents: 1 (once seeds sprout, reduce condensation to prevent mold).
- ● Labeling tags or markers: 10–20 (to track seed varieties and planting dates).
- ● Fertilizer (low-dose, water-soluble): 1 bottle (for when seedlings develop true leaves).
- ● Tweezers or small spoon: 1 (for delicate seed placement).
Step-by-step instructions for using plastic seed starting trays
Here's how to transform basic plastic trays into a germination powerhouse for vigorous seedlings.
🌱 Step 1: Prepare Trays and Soil for Optimal Germination
Start by filling your plastic seed starting trays with a sterile seed-starting mix—never garden soil. I like to press it lightly into each cell to eliminate air pockets while keeping the mix loose enough for tender roots. The goal is firm but not compacted soil that holds moisture without becoming soggy. Moisten the mix thoroughly with warm water until it feels like a damp sponge when squeezed.
I always pre-warm the soil in the trays for 12 hours before planting. Place the filled trays in a warm spot (around 70-75°F) to encourage faster germination. This step is especially important for slow-germinating seeds like peppers or tomatoes, which benefit from that extra warmth to break dormancy.
💧 Step 2: Sow Seeds at Proper Depth and Spacing
Follow the seed packet's depth guidelines, but remember: most seeds need planting at a depth of 2-3 times their diameter. For tiny seeds like lettuce, I use a toothpick to create small holes and place just one seed per cell. For larger seeds like beans, I drop two per cell and thin later. The reason for spacing is simple—crowded seedlings compete for nutrients and light, leading to weak, leggy plants.
After sowing, cover the seeds with a fine layer of soil and mist gently with a spray bottle. Avoid heavy watering at this stage—it can wash seeds too deep or create uneven moisture. I like to tap the tray lightly on the table to settle the soil around seeds without disturbing their placement.
☀️ Step 3: Create Ideal Germination Conditions
Place the trays under a grow light or in a warm, bright location (like a south-facing window) immediately after planting. Plastic trays excel at retaining moisture, but you'll still want to cover them with a clear plastic dome or plastic wrap to create a greenhouse effect. This keeps humidity high and soil temperatures stable—critical for germination. Check daily for condensation on the dome; if it's dry, mist the soil lightly to maintain moisture.
Germination times vary by seed type, but most will sprout within 5-14 days under these conditions. I keep a small notebook nearby to track which seeds have sprouted and when. This helps me anticipate thinning needs and adjust care routines before seedlings outgrow their cells.
🌿 Step 4: Transition to Light and Air Circulation
The moment you see the first green shoots, remove the plastic dome immediately. Trapped moisture around seedlings invites damping-off disease, which can kill them overnight. Place the trays under 14-16 hours of grow light daily, keeping the light 2-3 inches above the seedlings. You'll know the light is working when seedlings grow sturdy and dark green rather than leggy and pale.
Water from the bottom by placing the trays in a shallow tray of water for 10-15 minutes. This encourages roots to grow downward and prevents soil from splashing onto delicate leaves. I rotate the trays daily so all seedlings get even light exposure—you'll see this in their uniform growth patterns.
✂️ Step 5: Thin and Prepare for Transplanting
When seedlings develop their first true leaves (not the initial cotyledons), it's time to thin. Use scissors to snip unwanted seedlings at soil level rather than pulling them—this prevents disturbing the roots of remaining plants. I keep the strongest seedling per cell, choosing those with the most vibrant color and sturdy stems. The thinned seedlings can be transplanted directly into the garden if they're large enough.
Two weeks before your last frost date, start hardening off seedlings by placing them outside in a sheltered spot for 1-2 hours daily. Gradually increase their outdoor time over 7-10 days, watching for signs of stress like wilting or leaf scorch. Plastic trays make this process easier—they're lightweight and portable, so you can move them around as needed.
Tips & tricks for perfect seedling growth in plastic trays
These game-changing tricks will help you bypass common pitfalls and get the strongest possible starts every time.
The Warmth Factor: That 12-hour pre-warming at 70-75°F isn't just about speed—it's about breaking seed dormancy. For extra warmth, I place trays on top of my refrigerator (not inside!) where the motor keeps it consistently warm. This works especially well for seeds that need that extra nudge like tomatoes or peppers.
Seed Spacing Secret: When planting larger seeds like beans, I drop two per cell but mark the stronger one with a toothpick before germination. This lets me thin immediately after sprouting without disturbing the roots of my chosen seedling. The toothpick also helps me identify which cell has which seed type when managing multiple varieties.
Lighting Hack: For that 14-16 hour daily light requirement, I use a simple LED grow light on a timer. The key is keeping it 2-3 inches above seedlings—any closer and you'll scorch them, any farther and they'll stretch toward the light. I adjust the height weekly as seedlings grow, using a small ruler to measure the distance accurately.
Watering Wisdom: That 10-15 minute bottom-watering method isn't just efficient—it's a root developer. The roots naturally grow downward toward the moisture, creating stronger stems. I use a shallow tray with just enough water to reach the bottom of the cells, then drain any excess after 15 minutes. This prevents waterlogging while keeping the soil consistently moist.
Pro Tips for Plastic Seed Starting Trays
- These game-changing tricks will help you bypass common pitfalls and get the strongest possible starts every time.
- The Warmth Factor: That 12-hour pre-warming at 70-75°F isn't just about speed—it's about breaking seed dormancy. For ...
- Seed Spacing Secret: When planting larger seeds like beans, I drop two per cell but mark the stronger one with a toot...
Frequently asked questions
Got questions about using plastic seed starting trays? You’re not alone! Here are answers to the most common queries to help you get started with confidence.
Can I reuse plastic seed trays?
Yes, but with care! Clean trays thoroughly with soapy water and disinfect with a 10% bleach solution (1 part bleach to 9 parts water) to kill pathogens. Avoid reusing trays with root diseases or excessive wear. For long-term use, opt for durable, stackable trays designed for reuse.
How long should seeds stay in trays before transplanting?
Timing depends on the plant, but most seedlings are ready in 4–8 weeks. Check for true leaves (not cotyledons) and sturdy stems. Harden off seedlings by exposing them to outdoor conditions for 5–7 days before transplanting to prevent shock.
Are plastic trays better than biodegradable options?
Plastic trays offer durability, cost-effectiveness, and better drainage, making them ideal for beginners. Biodegradable options (like peat or coconut coir) are eco-friendly but may break down too quickly or lack structural support. Choose based on your priorities—budget, sustainability, or convenience!
What do I do if seedlings look leggy or weak?
Leggy seedlings often suffer from lack of light or overcrowding. Move trays to a bright, indirect light source (like a south-facing window or grow lights) and thin seedlings if needed. Avoid overwatering—keep soil moist but not soggy to encourage strong roots.
Can I use plastic trays for direct sowing outdoors?
Not recommended! Plastic trays are designed for controlled indoor germination. For outdoor sowing, use biodegradable pots or seed tape to prevent transplant shock. If you must use trays outdoors, ensure they’re secured and protected from pests/weather.
Wrapping up and next steps
Plastic seed starting trays are your secret weapon for effortless, high-quality germination—no fancy tools or gardening degree required! 🌱 Whether you’re a beginner or a seasoned green thumb, these trays offer consistency, durability, and easy transplanting, setting your seedlings up for success.
With the right setup and a little patience, you’ll be harvesting strong, healthy plants in no time.
Ready to level up your gardening game? Grab a pack of trays, pick your favorite seeds, and dive in—your future plants will thank you! For extra tips, check out our seedling care guide next.