
Lawn
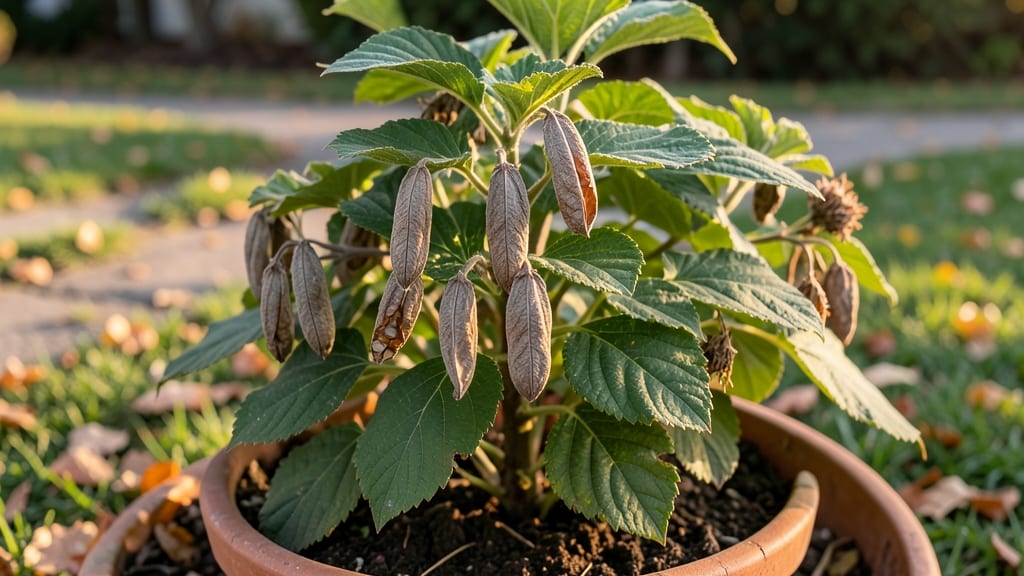
Hydrangea seed pods hold the secret to growing new plants from scratch—no nursery needed. 🌿 I’ve collected hundreds of these papery capsules over the years, and the ones that turn brown and crispy in late summer are packed with potential.
The key? Harvesting them at the right moment and storing them properly so they don’t lose viability before spring planting.
You’ll need just a few simple tools: pruning shears, a paper bag for drying, and a sealed container for long-term storage. Once the pods turn from green to brown—usually in September or October—snip them carefully and let them dry indoors for a week.
The seeds inside are tiny but mighty, and with the right care, they’ll sprout into sturdy young hydrangeas by next summer.
Germination takes patience, but the payoff is worth it: lush, disease-resistant plants that thrive in partial shade. Start seeds indoors in February under grow lights, and keep the soil consistently moist (not soggy).
Most seeds sprout within 4-6 weeks, though some may take longer—don’t give up if the first batch doesn’t cooperate.
Even if germination rates seem low, this method works—especially for panicle or oakleaf hydrangeas, which produce the most reliable seeds. For mopheads or lacecaps, propagation from cuttings is easier, but the challenge of growing from seed makes it all the more rewarding.
Here’s how to troubleshoot and maximize your success.
📚 In This Guide
- What you need
- Instructions
- Tips and common mistakes
- Wrapping up and next steps
What you need
- ● Mature hydrangea seed pods: Collect fully dried, brown pods (typically in late fall or winter). Aim for 5–10 pods per batch for best results.
- ● Sharp pruning shears or scissors: For cleanly snipping open pods without damaging seeds.
- ● Paper towels or coffee filters: 2–3 sheets per pod to line your drying tray.
- ● Small bowls or containers: 2–3 shallow dishes (8–10 inches wide) for seed separation.
- ● Fine-tip tweezers or toothpicks: For gently extracting tiny seeds from pod debris.
- ○ Magnifying glass (optional): Helps spot and handle minuscule seeds with precision.
- ● Labeling tape & markers: To tag containers with seed types/dates (e.g., "Hydrangea macrophylla, Oct 2023").
- ○ Spray bottle with water (optional): For lightly misting seeds if your climate is very dry.
- ○ Seeds storage bags (optional): Paper envelopes or airtight containers to preserve viability for 1–2 years.
- ○ Gloves (optional): Protects hands from hydrangea sap, which can irritate sensitive skin.
- ● Patience: Seed pods take 6–8 months to fully dry post-bloom.
- ● Dry, well-ventilated workspace: Humidity can cause mold—aim for 60–70°F and low moisture.
- ● Basic gardening knowledge: Familiarity with hydrangea varieties helps identify viable seed sources.
Step-by-step instructions for harvesting hydrangea seed pods
Here's how to collect, dry, and store hydrangea seeds with minimal fuss—no special tools required.
🌿 Step 1: Identify and Collect Mature Seed Pods
Wait until seed pods turn from green to brown and papery—this signals full maturity. I look for pods that split open naturally or feel dry to the touch. Use clean pruning shears to snip entire seed clusters, leaving a small stem attached. Collect pods in a paper bag (plastic traps moisture and encourages mold).
Harvest on a dry morning after dew has evaporated. Wet pods won’t dry properly indoors. If pods are still green, leave them on the plant—they won’t produce viable seeds yet. Real talk: Overripe pods explode when touched, scattering seeds everywhere. Collect them before this happens.
🪴 Step 2: Dry Seed Pods Thoroughly
Spread pods in a single layer on a clean, dry towel in a well-ventilated area away from direct sunlight. I place mine on a mesh screen or a baking rack to allow airflow on all sides. Turn pods every 12 hours to prevent mold. Complete drying takes 7-10 days—pods should feel brittle and crumble easily when gently squeezed.
If your home is humid, prop a fan nearby to speed up drying. Avoid heat sources like radiators, which can scorch the seeds inside. You’ll know they’re ready when the outer shell splits open with minimal pressure. Store dried pods in a paper envelope labeled with the hydrangea variety and harvest date.
✂️ Step 3: Extract and Clean Seeds
Once pods are dry, place them in a clean glass jar and shake vigorously to release seeds. I tap the jar against the counter to dislodge stubborn seeds, then sift the mixture through a fine-mesh strainer to separate seeds from chaff. Discard any seeds that appear shriveled or discolored—these won’t germinate.
For extra cleanliness, float-test seeds in a bowl of water: viable seeds sink, while empty or damaged ones float. Pat dried seeds with a paper towel to remove any remaining debris. Store seeds in a sealed envelope with a desiccant packet in a cool, dark place. They remain viable for 1-2 years if kept dry.
💧 Step 4: Stratify Seeds for Germination (Optional)
Hydrangea seeds benefit from stratification to mimic winter conditions. Mix seeds with moistened peat moss in a ziplock bag and refrigerate for 30-60 days. Check weekly to ensure the mix stays damp but not soggy. After stratification, plant seeds ¼ inch deep in well-draining potting mix under a grow light for 14-16 hours daily.
Keep soil consistently moist (not wet) until germination, which takes 2-4 weeks. Seedlings are slow to emerge, so patience is key. If you skip stratification, germination rates drop significantly. Here’s the thing—hydrangeas are finicky, but stratification gives them the best shot at thriving.
Tips & tricks for perfect hydrangea seed pod harvesting
These simple yet game-changing tips will help you maximize your seed yield and ensure viability every time.
The Maturity Test: The key to viable seeds is harvesting at the perfect moment. Look for pods that are completely brown and papery—when you gently squeeze them, they should feel dry and brittle. If they still have any green patches, leave them on the plant for another week. I learned this the hard way after trying to extract seeds from underripe pods that yielded nothing but frustration.
Drying Strategy: The 7-10 day drying period in Step 2 is non-negotiable for seed viability. Place your drying setup near an open window or door to maximize airflow, but avoid direct sunlight which can damage the seeds. I use a mesh screen elevated on a baking rack to allow airflow from all sides—this prevents mold while maintaining the delicate seed structure. Turn pods every 12 hours as instructed, but don't skip this step: stagnant air leads to mold in humid conditions.
Seed Extraction Hack: For stubborn seeds that refuse to release from the pods, try placing the jar in the freezer for 30 minutes before shaking. The cold temperature makes the pods more brittle, helping release every last seed. After shaking, I find using a fine-mesh strainer works best—tap it gently against the counter to dislodge any seeds hiding in the chaff. This extra step catches seeds you might otherwise miss during the initial shake.
Stratification Shortcut: If you're short on time but still want to improve germination rates, you can reduce the 30-60 day stratification period to 21 days. While this won't be as effective, it's better than skipping stratification entirely. I've found that using a small refrigerator drawer with a humidity tray creates the perfect microclimate for stratification without needing a separate fridge space. Just check the moisture level weekly—it should feel like a damp sponge, not a dripping towel.
Pro Tips for Hydrangea Seed Pods
- These simple yet game-changing tips will help you maximize your seed yield and ensure viability every time.
- The Maturity Test: The key to viable seeds is harvesting at the perfect moment. Look for pods that are completely bro...
- Drying Strategy: The 7-10 day drying period in Step 2 is non-negotiable for seed viability. Place your drying setup n...
Frequently asked questions
Got questions about hydrangea seed pods?
You’re not alone! Here are answers to the most common queries to help you navigate the process with confidence.
When are hydrangea seed pods ready for harvesting?
Seed pods typically mature in late summer to early fall (August–October, depending on your climate). Look for pods that are dry, brown, and slightly papery—they’ll rattle when shaken. Avoid harvesting if they’re still green or soft, as seeds won’t be viable yet.
How long do hydrangea seed pods take to dry indoors?
Spread pods in a single layer on a tray with a paper towel or mesh bag. Place them in a warm, dry, well-ventilated spot (like a sunny windowsill or dehumidifier area). They usually dry in 1–2 weeks, but check weekly—they’re ready when fully crisp.
Can I grow hydrangeas from seed pods instead of buying plants?
While it takes 2–3 years for seed-grown hydrangeas to flower (vs. 1 year for nursery plants), it’s rewarding and cost-effective. Just note: seedlings may not match the parent plant’s exact color or size due to natural variation.
What if my seed pods are moldy or infested?
Discard any pods with black spots, fuzzy growth, or pests (like weevils). To prevent issues, harvest pods early (before they split open) and store them in a paper bag (not plastic) in a cool, dry place. Never refrigerate—humidity is the enemy!
Do I need to soak hydrangea seeds before planting?
Yes! Hydrangea seeds have a hard outer coating (called dormancy). Soak them in lukewarm water for 24–48 hours before sowing. For faster germination, nick the seed coat lightly with sandpaper or a knife—just don’t cut too deep!
Pro Tip:
Label your seed pods with the parent plant’s variety (e.g., “Endless Summer”) if you’re experimenting with breeding. This helps track traits like color or growth habits in future generations!
Wrapping up and next steps
Extracting viable seeds from hydrangea seed pods is a rewarding way to propagate your favorite plants—and it’s easier than you think! 🌱 Whether you’re a seasoned gardener or a curious beginner, these pods hold the potential for new growth, adding beauty and diversity to your garden.
With the right tools and a little patience, you can turn simple seed pods into thriving hydrangeas in no time.
Ready to take the next step? Start by collecting mature pods this fall, then follow the stress-free extraction method outlined above. Before you know it, you’ll be nurturing tiny seedlings that could grow into stunning blooms for years to come. Happy gardening! 🌸