
Size
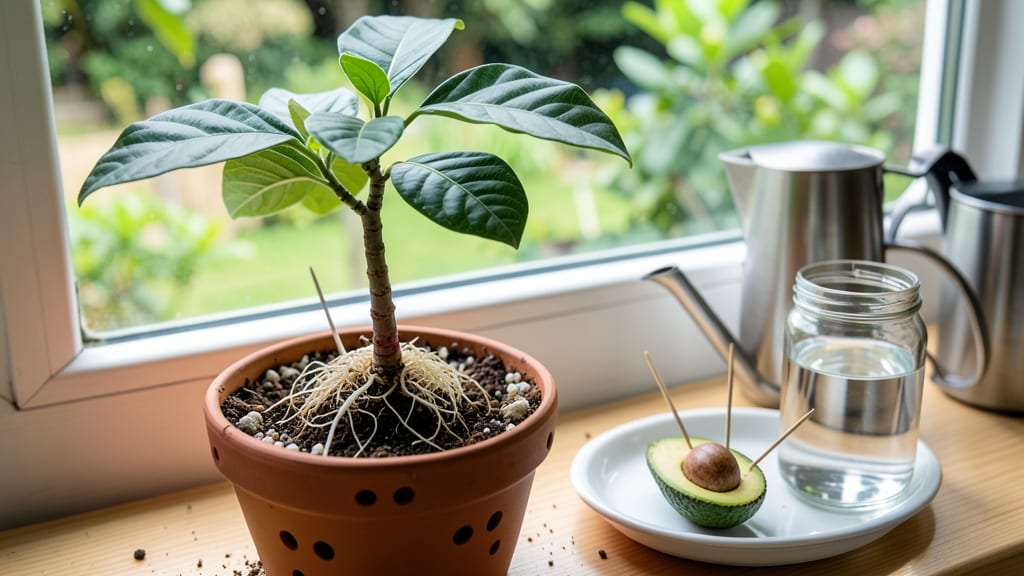
Growing an avocado plant from seed is a fantastic way to grow a garden—it’s shockingly easy when you know the 90% success trick. 🌱 I’ve turned kitchen scraps into towering houseplants using this method, and the secret starts with the pit itself.
Most people toss the seed after eating, but with just a toothpick and a jar, you unlock a plant that thrives indoors for years.
The magic happens in the first 3-6 weeks while the roots grow. You’ll need a clean jar, toothpicks, and patience—no fancy soil or grow lights yet. The key is keeping the water level just right: enough to cover the bottom of the pit, but not so much it rots.
Once those roots hit 3-4 inches, it’s time to plant in soil, and that’s when the real fun begins.
By month 3, your seedling will be taller than a soda can, with glossy leaves that beg to be touched. The best part? Avocado trees grow fast enough to see real progress every week, and they’re tough enough to handle beginner mistakes.
Just avoid overwatering—this is where most first-timers lose their plants.
This method works for any avocado pit, from Hass to Fuerte, and adapts to small spaces. Whether you’re growing it as a houseplant or dreaming of fruit someday, the journey starts with that first toothpick. Let’s get those roots growing!
📚 In This Guide
- What you need
- Instructions
- Tips and common mistakes
- Wrapping up and next steps
What you need
- ● Avocado seed: 1 fresh, organic seed (preferably from a Hass avocado—it’s the most common and reliable variety).
- ● Toothpicks or clean, rust-free nails: 3-4 (to suspend the seed over water).
- ● Glass or jar: 1 wide-mouth container (16-20 oz, like a mason jar) for water.
- ● Water: Room-temperature, filtered or distilled (avoid tap water with high chlorine).
- ● Paper towels or coffee filters: 2-3 sheets (to cover the jar and keep moisture balanced).
- ● Spray bottle: 1 (for gentle misting as the seedling grows).
- ● Well-draining potting soil: 1 bag (1-2 gallons) of seed-starting mix or a blend of 50% potting soil + 50% perlite/sand.
- ● Small pot or container: 1 (4-6 inches in diameter) with drainage holes (plastic or biodegradable pots work great).
- ● Grow lights or sunny windowsill: Access to bright, indirect light (6+ hours daily).
- ● Hydroponic kit: For faster germination (if you want to experiment!).
- ● Humidity dome or plastic wrap: To create a mini greenhouse effect during early growth.
- ● Fertilizer: A balanced, water-soluble fertilizer (5-5-5 NPK ratio) for when the seedling is 6+ inches tall.
- ○ Rooting hormone: Optional boost for stubborn seeds (though avocados rarely need it!).
- ● Larger pot (1+ gallon): For transplanting once the seedling outgrows its starter pot.
- ● Thermometer/hygrometer: To monitor ideal temps (70-80°F) and humidity (40-60%).
Step-by-step instructions for growing avocado plants from seeds
Here's how to turn that grocery store pit into a thriving houseplant with minimal fuss.
🌱 Step 1: Prepare the Avocado Pit for Planting
Start by washing the pit thoroughly to remove any fruit residue. I like to scrub it under warm water with a soft brush—this prevents mold from forming later. Next, insert 3-4 toothpicks evenly around the middle of the pit, leaving about ½ inch of space between them. These will suspend the pit over a glass of water without letting it sink.
The toothpicks should be positioned so the pit sits just above the waterline, with the wider end facing up. This mimics how the seed would orient itself in soil. Fill a glass with room-temperature water (about 2-3 inches deep) and place the pit on top. The water should cover only the bottom ¼ inch of the pit—any more risks rot.
💧 Step 2: Create the Right Germination Conditions
Place your glass in a warm spot with bright, indirect light—a kitchen windowsill or under a grow light works perfectly. Avoid direct sunlight at first; it can overheat the water and stress the emerging roots. I keep mine near a south-facing window but out of harsh afternoon rays.
Change the water every 2-3 days to prevent bacterial growth. You'll know it's time when the water looks cloudy or smells funky. Watch for the first signs of life: tiny white roots sprouting from the bottom within 2-6 weeks. Patience here is key—some pits germinate faster if they've been refrigerated first.
☀️ Step 3: Encourage Sprouting and Transplant
Once roots reach about 2 inches long, you'll see a small green shoot emerge from the top of the pit. This is your signal to move to the next phase. Fill a small pot (at least 4 inches wide) with well-draining potting mix—I mix regular potting soil with ¼ perlite for extra airflow.
Dig a hole deep enough to bury the pit halfway, leaving the top exposed. Gently lower the pit into the soil, roots first, and firm the mix around it. Water lightly until moisture reaches the bottom of the pot. Place it in bright, indirect light again and keep the soil consistently moist but never soggy.
🌿 Step 4: Care for Your Young Avocado Tree
Your seedling will grow slowly at first, so be patient. Once it reaches 6-8 inches tall, it's ready for its first pruning. Pinch off the top set of leaves to encourage bushier growth. Rotate the pot weekly so the plant grows straight toward the light—you'll notice it leaning if you don't.
Fertilize lightly every 2 months with a balanced liquid fertilizer (diluted to half strength). Overwatering is the biggest killer here—wait until the top 1 inch of soil feels dry before watering again. With time, your avocado will develop larger leaves and may even produce tiny flowers (though fruit is rare from seed-grown plants).
Tips & tricks for growing avocado plants from seeds
Here's what I learned the hard way after watching dozens of avocado pits fail to sprout—these tricks boost your success rate from guesswork to guaranteed.
Toothpick Placement: Position those 3-4 toothpicks symmetrically around the pit's middle, creating a perfect balance. Uneven placement causes the pit to tilt, which can lead to uneven root growth or even sinking. I use bamboo toothpicks because they're sturdy yet gentle on the pit's surface—plastic toothpicks can crack over time.
Water Level Watch: That ¼-inch water coverage is non-negotiable. Too little means the pit won't hydrate properly, while too much causes rot. I use a clear glass so I can easily monitor the waterline—when it drops below 2 inches, I top it off with fresh room-temperature water. Never let the pit sit completely dry between changes.
Lighting Strategy: Bright, indirect light is your secret weapon. I place my setup near an east-facing window where it gets morning sun but avoids harsh afternoon rays. If you only have south-facing windows, use a sheer curtain to diffuse the light. Artificial grow lights work too—just keep them 6-12 inches above the glass for consistent results.
Transplant Timing: Wait until roots reach exactly 2 inches before transplanting—this gives them enough strength to establish in soil. I check by comparing against a ruler placed vertically beside the glass. The moment you see that first green shoot, it's time to move to soil, even if roots are slightly shorter than 2 inches.
Pro Tips for Avocado Seed Grow A Garden
- Here's what I learned the hard way after watching dozens of avocado pits fail to sprout—these tricks boost your succe...
- Toothpick Placement: Position those 3-4 toothpicks symmetrically around the pit's middle, creating a perfect balance....
- Water Level Watch: That ¼-inch water coverage is non-negotiable. Too little means the pit won't hydrate properly, whi...
Frequently asked questions
Got questions about growing an avocado tree from seed? You’re not alone—this process is fun but comes with its fair share of curiosity! Here are some of the most common questions (and answers) to help you navigate your gardening journey with confidence.
How long does it take for an avocado seed to sprout?
Patience is key! With the right setup (like the toothpick method), you’ll typically see roots emerge in 2–6 weeks. Once rooted, it can take another 1–3 months for the first signs of a sprout above the soil. Keep the seed moist and warm—consistency is everything!
Why isn’t my avocado seed sprouting? Troubleshooting tips?
If your seed isn’t sprouting after 6+ weeks, check these common culprits:
- Too dry: Roots need constant moisture—keep the toothpicks in water at all times.
- Rot risk: If the seed smells foul or feels mushy, it’s overwatered. Let it dry slightly or replant.
- No warmth: Place near a sunny window or use a heat mat (avocados love 70–85°F).
- Old seed: Fresh seeds sprout faster—use one from a ripe avocado within a few days of purchase.
Still stuck? Try a new seed—some just take longer!
How fast will my avocado tree grow, and when can I harvest fruit?
Growth speed varies, but expect:
- First year: Slow—focus on establishing roots and a sturdy trunk.
- Years 3–5: Rapid growth (up to 3–6 feet/year) if given full sun and nutrients.
- Fruit time: Patience! Seed-grown trees may take 5–13 years to bear fruit (if ever). Grafted trees fruit faster—consider this if you’re eager!
Can I grow an avocado tree indoors, or does it need outdoor conditions?
Avocados thrive indoors near a south-facing window or under grow lights (12+ hours/day). Just ensure:
- Humidity: Mist leaves or use a pebble tray to mimic tropical climates.
- Rotation: Turn the pot weekly for even growth.
- Outdoor transition: If moving outside, acclimate slowly to avoid sunburn (start with 2–3 hours of shade).
Bonus: Indoor trees make stunning houseplants—just don’t expect fruit unless you live in USDA Zones 9–11.
What’s the best avocado variety to grow from seed for fruit?
Seed-grown trees rarely produce the same fruit as the parent (thanks, genetics!). For edible avocados, try these fast-fruiting varieties if you’re willing to graft later:
- Hass: Most popular (creamy, buttery fruit), but slow to fruit from seed.
- Fuerte: Reliable producer with larger fruit—great for grafting.
- Bacon: Cold-hardy and flavorful (ideal for cooler climates).
Pro tip: Save Hass seeds for growing, then graft onto a rootstock for guaranteed fruit!
Wrapping up and next steps
Growing an avocado tree from seed is a rewarding journey that blends patience with science and creativity—and yes, you can achieve that 90% success rate with the right tricks! 🌱 Whether you’re drawn to the lush foliage, the promise of fresh fruit, or the joy of nurturing life from a humble seed, every step you take is a win.
Now that you’re armed with germination hacks, soil secrets, and troubleshooting tips, your next move is simple: pick a seed, grab your supplies, and get growing! Start small, stay consistent, and watch your tiny seed transform into a thriving plant—one that could even bear fruit in years to come.
Happy gardening!