
Lawn
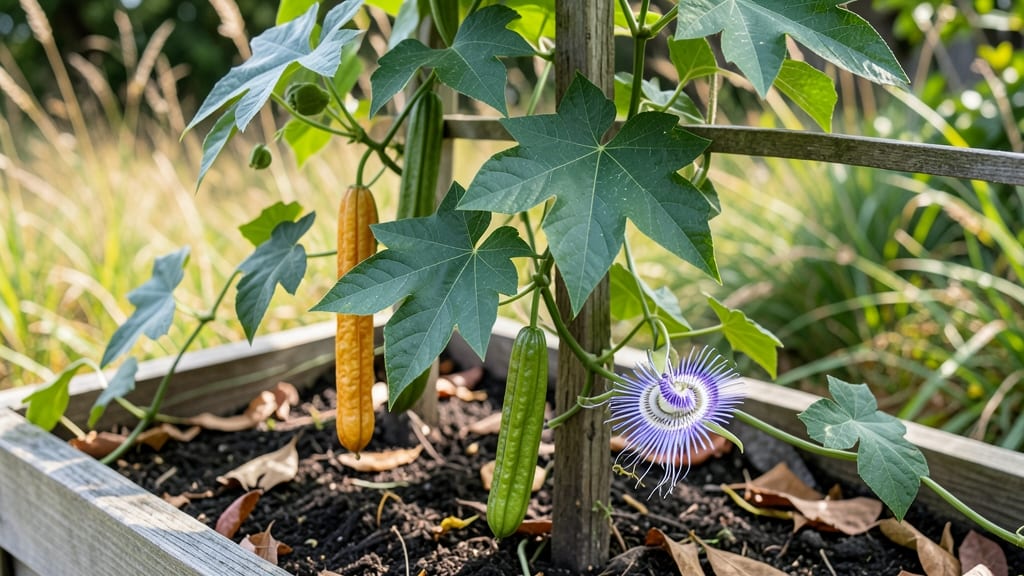
Harvesting passionflower seed pods transforms your garden into a self-sustaining source of these exotic vines—no more buying transplants ever again. 🌿 The key is timing: pods turn from green to papery brown when ready, and a gentle squeeze should release seeds inside.
I’ve collected hundreds this way, and the process gets easier each year once you know what to look for.
Once you’ve gathered the pods, crack them open to reveal the tiny black seeds nestled in fibrous pulp. A quick rinse under water removes the sticky residue, leaving you with clean seeds ready for storage.
These seeds have a natural dormancy period, so don’t rush to plant them—stratifying (chilling) them for 30-60 days in a damp paper towel mimics winter conditions and boosts germination rates.
When you’re ready to plant, sow the seeds in well-draining soil, barely covering them since they need light to germinate. Keep the soil consistently moist but not soggy, and within 2-4 weeks, you’ll see those first delicate shoots pushing through.
Passionflowers grow fast once established, and with proper care, you’ll have vines climbing and blooming within a season.
This method works for both indoor starters and outdoor plantings, making it perfect for gardeners with limited space or unpredictable climates. The best part? You’ll never have to buy passionflower seeds again—just save, store, and replant year after year.
📚 In This Guide
- What you need
- Instructions
- Tips and common mistakes
- Wrapping up and next steps
What you need
- ● Passionflower vines – Healthy, mature plants with ripe seed pods (look for dried, brown pods that easily open).
- ● Pruning shears or sharp scissors – For cleanly harvesting pods without damaging the vine.
- ● Paper bags or breathable fabric sacks – 2–3 medium-sized bags (10x12 inches) to collect pods and allow airflow.
- ● Labeling tags & marker – To mark varieties (e.g., Passiflora incarnata vs. Passiflora caerulea).
- ● Drying tray or screen – A flat, elevated surface (like a wire rack) to air-dry pods.
- ○ Paper towels or silica gel packs – Optional but helpful for speeding up drying in humid climates.
- ● Glove – Protects hands from thorns on some passionflower varieties.
- ● Small fan or dehumidifier – For faster drying in damp conditions.
- ● Seed storage jars – Airtight containers with silica packets to preserve viability.
- ● Notebook – To log harvest dates and pod characteristics.
How to harvest passionflower seed pods for reliable year-round saving
Here's my foolproof method for collecting seeds that stay viable for planting next season.
🌿 Step 1: Identify and Select Ripe Seed Pods
Passionflower seed pods turn from vibrant green to a deep brown when fully mature—this usually happens in late summer or early fall, depending on your climate. Gently squeeze a pod to check for readiness; it should feel firm but slightly papery, not hard or leathery. I always harvest pods that have naturally dropped to the ground first, as these tend to be the most mature.
Look for pods that are fully dried and starting to split open along their seams. If you find pods still green or firm, leave them on the vine—they won't produce viable seeds yet. Harvest on a dry morning after the dew has evaporated, as moisture can encourage mold growth during storage.
✂️ Step 2: Harvest and Prepare the Pods
Use clean, sharp pruning shears to snip the pods from the vine, leaving about an inch of stem attached. Place them in a paper bag (not plastic) to allow airflow and prevent condensation. I like to label each bag with the variety name and harvest date—this helps track which seeds might need special treatment later.
Once home, spread the pods out on a clean, dry towel in a single layer. Let them dry for an additional 3-5 days in a warm, dry place with good airflow. This extra drying ensures any lingering moisture evaporates, which is critical for preventing mold during storage. You'll know they're fully dry when the pods feel light and brittle.
🌱 Step 3: Extract and Clean the Seeds
When the pods are completely dry, gently crush them by hand over a clean sheet of paper. The seeds will spill out easily, but avoid pressing too hard—you don't want to damage the seed coats. I find it easiest to hold the pod over the paper and tap it lightly with a spoon to release the seeds without creating too much dust.
Remove any chaff, debris, or empty seed casings by winnowing them in a gentle breeze or by using a fine-mesh strainer. Store the clean seeds in a small, airtight container like a glass jar or envelope. I add a silica gel packet to keep moisture levels low—this helps maintain viability for up to 2 years if stored properly.
🪴 Step 4: Store Seeds for Long-Term Viability
Place your sealed container of seeds in a cool, dark place like a pantry or refrigerator. The ideal storage temperature is between 35-45°F, which slows down metabolic activity and preserves freshness. I like to keep mine in the crisper drawer of my fridge, where the humidity is naturally low.
Before planting next season, do a quick viability test by soaking a few seeds in warm water for 24 hours. Healthy seeds will plump up and sink to the bottom, while old or non-viable seeds will remain floating. This simple check saves time and ensures you're not wasting effort on seeds that won't germinate.
⏰ Step 5: Prepare for Next Season's Planting
In early spring, remove the seeds from storage and let them acclimate to room temperature for 24 hours before planting. Passionflower seeds benefit from a brief cold stratification period, so I place them in a sealed bag with a bit of damp sand and refrigerate for 4-6 weeks before sowing. This mimics winter conditions and encourages stronger germination.
Plant the seeds in well-draining soil, about ¼ inch deep, and keep the soil consistently moist until germination occurs, which typically takes 2-4 weeks. Use a humidity dome or plastic wrap to retain moisture during this critical period. Once seedlings emerge, thin them to the strongest 2-3 plants per pot to give them room to grow.
Tips & tricks for perfect passionflower seed pod harvesting
Between us, these small details make all the difference when saving seeds that'll sprout reliably next year.
Ripeness Test: In Step 1, when checking for readiness, look for pods that feel firm but give slightly when squeezed—like a ripe avocado. If they're rock-hard, they're not ready yet. I've learned the hard way that harvesting too early means seeds won't germinate, so always wait for that deep brown color and slight papery texture. The pods that naturally drop to the ground are usually the most mature and reliable.
Drying Strategy: The 3-5 days of extra drying in Step 2 is non-negotiable for mold prevention. I place my pods on a wire rack in my garage where the airflow circulates naturally. If you're in a humid climate, consider using a small fan on low to speed up the process safely. You'll know they're ready when they feel light enough to float in water—this is your perfect indicator of complete dryness.
Seed Extraction: When gently crushing the pods in Step 3, I use a rolling pin wrapped in a clean kitchen towel to protect the seeds from any accidental damage. The towel also helps catch any fine debris that might otherwise mix with your seeds. For stubborn pods, I'll place them in a paper bag and gently crush with a mallet—this method preserves more seeds than hand-crushing alone.
Storage Wisdom: The cool, dark storage environment in Step 4 is crucial for maintaining viability. If you don't have a refrigerator, a root cellar or basement works well too. I've had success storing seeds in the vegetable crisper drawer of my fridge, but avoid the freezer—temperature fluctuations can damage the seeds. The silica gel packet is optional but highly recommended, especially if you live in a humid climate.
Pro Tips for Passionflower Seed Pods
- Between us, these small details make all the difference when saving seeds that'll sprout reliably next year.
- Ripeness Test: In Step 1, when checking for readiness, look for pods that feel firm but give slightly when squeezed—l...
- Drying Strategy: The 3-5 days of extra drying in Step 2 is non-negotiable for mold prevention. I place my pods on a w...
Frequently asked questions
Got questions about harvesting and saving passionflower seed pods? Here are some of the most common concerns—and their answers—to help you stress-free!
When is the best time to harvest passionflower seed pods?
Harvest pods when they turn wooden-brown and split open naturally—usually late summer to early fall. Avoid harvesting if pods are still green or soft, as seeds won’t be fully mature. Overripe pods may scatter seeds, so act quickly once they’re dry!
How do I know if the seeds inside are still viable?
Viable seeds are plump, firm, and dark brown. If they’re shriveled, moldy, or discolored, they’ve lost viability. For extra assurance, test 3-5 seeds in damp paper towels—viable ones should sprout within 10-14 days. Pro tip: Store seeds in a cool, dry place to extend their shelf life!
Can I save passionflower seeds from store-bought flowers?
Nope! Store-bought flowers are often bred for aesthetics, not seed viability. For reliable seeds, grow your own passionflower plants or source seeds from organic nurseries. Hybrid varieties may not produce true-to-type offspring, so check labels or ask the seller.
What if my pods get eaten by pests before I can harvest?
Pests like slugs, beetles, or squirrels can be a nuisance! Protect pods with floating row covers or neem oil spray. For squirrels, harvest pods as soon as they’re ripe and store them indoors. If damage occurs, inspect seeds—many pests avoid fully mature pods.
How long can I store passionflower seeds before planting?
Seeds stay viable for 1-2 years if stored in a sealed container with silica gel or in the fridge. After that, germination rates drop. Label your containers with the harvest date to track freshness. Pro tip: Test a few seeds annually to monitor viability!
Wrapping up and next steps
Harvesting passionflower seed pods is a rewarding way to ensure a steady supply of these unique plants year-round—whether for ornamental beauty or natural stress relief! 🌿 With the right tools, timing, and techniques, you can easily collect, dry, and store seeds for future planting.
Whether you're a seasoned gardener or just starting, this process is simpler than you think.
Ready to take the next step? Start by monitoring your passionflower vines for ripe pods, then follow the harvesting and storage tips shared here. Soon, you’ll be enjoying lush, thriving plants—and maybe even a soothing cup of passionflower tea! 🍵