
Lawn
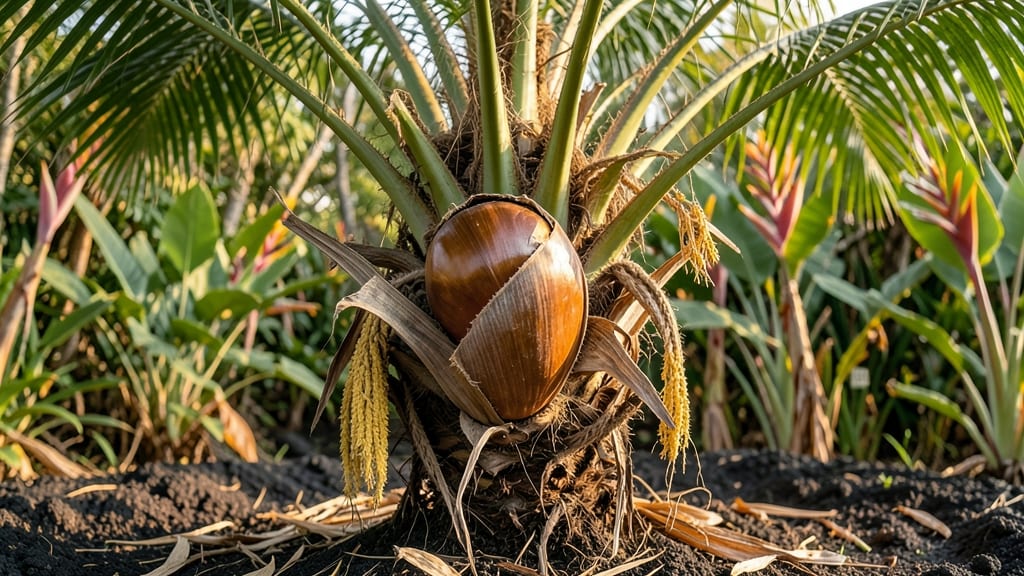
Your backyard could transform into a tropical escape with palm tree seed pod art—no twisting required. 🌿 These natural treasures turn garden debris into stunning decor. I’ve turned my own fallen pods into wind chimes that sway beautifully in the breeze, adding texture and movement to any outdoor space.
The best part? You don’t need fancy tools or materials. A simple harvest from your yard (or a local park with permission) gives you free, sustainable decor that lasts for years.
These pods bring an organic, coastal vibe to patios, porches, or even indoor arrangements—think wreaths, sculptures, or rustic wall hangings.
By the end, you’ll have unique pieces that feel handcrafted and effortlessly chic. The pods’ natural curves and earthy tones blend seamlessly with greenery, driftwood, or painted accents. Plus, they’re lightweight yet durable, perfect for both casual and statement-making designs.
Whether you’re a DIY beginner or a seasoned crafter, these projects scale to your skill level. Start small with a single pod or go bold with a full garden installation. The possibilities are as endless as the pods themselves—let’s get creative!
📚 In This Guide
- What you need
- Instructions
- Tips and common mistakes
- Wrapping up and next steps
What you need
- ● Palm tree seed pods: 3–5 medium-sized pods (fresh or dried, depending on your project). Look for Cocos nucifera (coconut) or Borassus flabellifer (palmyra) for best texture.
- ● Sandpaper: 1 sheet of medium-grit (120–150) and 1 sheet of fine-grit (220–320) for smoothing rough edges.
- ● Non-toxic sealant: 1 small bottle of matte or satin polyurethane (water-based for eco-friendliness) or mod podge for a glossy finish.
- ● Paint or natural dyes: Acrylic paint (1–2 colors) or natural options like turmeric (yellow), beet juice (pink), or coffee (brown).
- ● Paintbrushes: 1–2 fine-tip brushes (sizes 2–4) for detailing and 1 wide brush for base coats.
- ● Safety gloves: 1 pair of nitrile or latex-free gloves (to protect hands from sap and sealants).
- ● Cloth or paper towels: 2–3 for wiping spills or excess sealant.
- ● Ruler & pencil: For marking measurements if carving or drilling.
- ○ Drill (optional): A low-speed drill with a 1/16" bit for adding holes (e.g., for hanging or decorative patterns).
- ○ Hot glue gun (optional):strong> For attaching pods to bases like driftwood or wire frames.
- ○ Twine or fishing line (optional):strong> Thin, natural fibers for macramé-style hanging decor.
- ● 🌡️ Drying pods: If using fresh pods, air-dry for 2–4 weeks in a well-ventilated area (turn occasionally). Speed up drying with a fan or dehumidifier.
- ● ✨ Sap safety: Wear gloves when handling—some pods (like coconut) have mild irritants. Rinse with water if sap touches skin.
- ● 🎯 Surface prep: Lightly sand pods before sealing to ensure paint/sealant adheres smoothly.
How to harvest palm tree seed pods for twist-free natural decor
Skip the frustration of tangled fibers—here's how to collect and prep palm seed pods cleanly for stunning, long-lasting decor.
🌿 Step 1: Identify and Select Mature Seed Pods
Look for pods that have turned a light brown color and feel dry to the touch—they're ready for harvesting. I always check in late summer or early fall when pods naturally release seeds. Avoid green pods; they're too fibrous and won't clean up properly. You'll need about 4-6 mature pods to create a full decor piece.
Gently shake the pod over a bucket or large bag to catch any loose seeds inside. This prevents them from scattering everywhere when you cut. I like to work on a tarp or newspaper to make cleanup easier. If the pod is still attached to the tree, use pruning shears to cut the stem, leaving about 2 inches of stalk attached—this makes handling easier later.
✂️ Step 2: Cut and Clean the Pods
Lay the pod on a flat surface and slice it open lengthwise with a sharp knife or pruning shears. Be careful not to cut too deeply—you only need to split the outer shell enough to access the fibers inside. I find a serrated knife works best for clean cuts. Once opened, remove any remaining seeds by hand and discard them.
Rinse the opened pod under warm water to remove dirt and debris. Use your fingers to gently separate the inner fibrous material from the hard outer shell. This is the part you'll use for your decor. Soak the fibers in warm water for 10-15 minutes to soften them—this makes the next step much easier. Drain and pat dry with a towel, but don't squeeze too hard or the fibers will fray.
💧 Step 3: Extract and Prepare Fibers
Hold the pod halves under running water and gently pull apart the fibers. They should separate easily now that they've been soaked. I like to work in small sections, pulling the fibers outward from the center of the pod. Use your fingers to tease apart any tangled strands—this is where most people get frustrated, but patience pays off.
Once all the fibers are loose, lay them flat on a clean surface and let them air dry completely. This usually takes 24-48 hours, depending on humidity. You'll know they're dry when they feel crisp to the touch and no longer stick together. Avoid using heat to speed this up—it can weaken the fibers and make them brittle.
🪴 Step 4: Shape and Style Your Decor Piece
Now comes the creative part! Arrange the dried fibers into your desired shape—whether it's a wreath, a wall hanging, or a centerpiece. I often start with a base structure made of wire or twine to hold the fibers in place. Gently wrap the fibers around the base, securing them with small amounts of non-toxic glue or by weaving them together.
For added texture, mix in other natural elements like dried flowers, leaves, or small branches. Let the glue dry completely before handling. Once your piece is fully assembled, seal it with a clear, non-toxic varnish to protect it from moisture and dust. This step ensures your decor stays looking fresh for years. Display your creation in a spot where it can catch the light and showcase its natural beauty.
Tips & tricks for perfect palm tree seed pod art
Here's what nobody tells you about turning those tricky pods into beautiful decor without the frustration.
Pod Selection Secret: The color and texture of your pods make all the difference. Look for pods that are completely dry and have turned a light tan color—these will yield the cleanest fibers. I've learned the hard way that even slightly green pods require extra soaking time and still end up with more tangles. In Step 1, if you're unsure about a pod's readiness, give it a gentle squeeze—if it feels spongy, it needs more time to mature.
Cutting Technique: When you're ready to open the pods in Step 2, use a serrated knife and make a single, confident cut down the center. The key is to split just the outer shell—not to cut all the way through to the fibers inside. This prevents the fibers from tearing during extraction. I also recommend wearing gloves for this step; the fibers can be surprisingly prickly and leave small scratches on your hands.
Soaking Strategy: The 10-15 minute soak in Step 2 is crucial for fiber separation, but don't overdo it—the fibers can become too soft and difficult to work with. Use warm (not hot) water and make sure the pods are fully submerged. After draining, I like to roll the soaked fibers gently between two clean towels to remove excess moisture without squeezing, which helps maintain their integrity for the drying process.
Drying Wisdom: For the 24-48 hour drying period in Step 3, choose a well-ventilated area away from direct sunlight. I've found that placing the fibers on a wire cooling rack works best—the airflow prevents moisture buildup between the strands. If you're in a humid climate, you might need the full 48 hours. The fibers are ready when they feel crisp and no longer stick together; this is your cue that they're properly prepared for shaping.
Pro Tips for Palm Tree Seed Pod Art
- Here's what nobody tells you about turning those tricky pods into beautiful decor without the frustration.
- Pod Selection Secret: The color and texture of your pods make all the difference. Look for pods that are completely d...
- Cutting Technique: When you're ready to open the pods in Step 2, use a serrated knife and make a single, confident cu...
Frequently asked questions
Got questions about crafting with palm tree seed pods? We’ve got answers! Here are some of the most common queries—plus tips to make your project a breeze.
Can I use any palm tree seed pods for art, or are some better than others?
Not all pods are created equal! Look for cocos nucifera (coconut) or Sabal palmetto pods—they’re sturdy, textured, and perfect for carving or painting. Avoid soft or moldy pods, as they won’t hold up well in decor. Always harvest from fallen pods to avoid harming the tree.
How long does it take for palm seed pods to dry before I can use them?
Fresh pods need 4–6 weeks to dry completely in a well-ventilated, dry area (like a garage or under a shade cloth). Speed it up with a fan or dehumidifier, but avoid direct sunlight—it can warp the wood. Test dryness by tapping the pod; it should sound hollow, not damp.
What’s the best way to clean and prep the pods before decorating?
Start by scrubbing pods with warm, soapy water and a brush to remove dirt. Rinse thoroughly, then let them air-dry. For a smooth surface, lightly sand with 120-grit sandpaper (skip this if you love the natural texture!). Seal with non-toxic polyurethane or mod podge to protect your design and prevent cracking.
What tools do I need if I want to carve designs into the pods?
You don’t need fancy tools! A wood-burning tool (for intricate details) or a Dremel with a carving bit works great for beginners. For simpler cuts, a utility knife or coping saw suffices. Always wear a mask—palm wood dust can irritate lungs. Pro tip: Sketch your design with a pencil first!
What are some creative alternatives if I can’t find palm seed pods?
No palm pods? No problem! Try these natural substitutes:
- Acorn caps (lightweight, great for mobiles)
- Pinecones (larger, ideal for rustic decor)
- Dried citrus rinds (textured, perfect for painting)
- Seed pods from lotus or hibiscus (unique shapes for jewelry)
Why did my painted pod turn out streaky or uneven?
Streaky paint usually means the pod wasn’t sealed first or the paint was too thick. Fix it by lightly sanding the area, wiping with a damp cloth, and applying a thin, even coat of primer or sealant. Let it dry completely between layers. For metallic or glossy finishes, use acrylic paint labeled “non-streaky” or “heavy-body.”
Wrapping up and next steps
Transforming palm tree seed pods into stunning art isn’t just creative—it’s a rewarding way to bring nature’s beauty into your home! Whether you’re crafting functional decor or unique gifts, these twist-free harvesting tips make the process simple and sustainable. 🌿✨
Ready to turn your harvest into something extraordinary? Start by experimenting with a small batch of pods—let your imagination run wild! Try painting, weaving, or even carving to see what resonates with you. The possibilities are endless, and every piece will carry the charm of your own backyard.