
Lawn
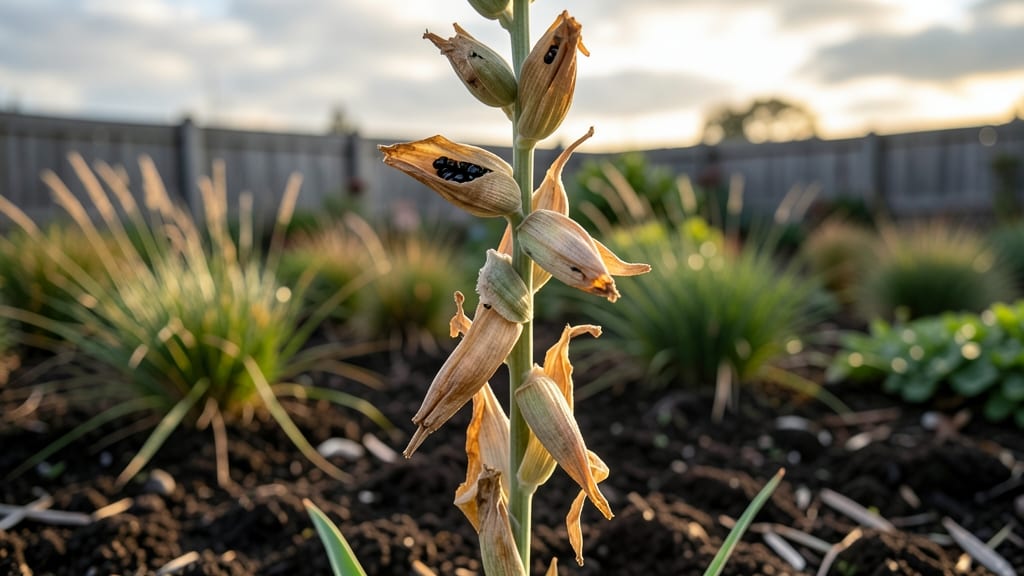
Gladiolus seed pods are nature’s way of rewarding patience—if you know how to handle them. 🌱 The twisty, spiky pods can feel like a gardener’s worst enemy, but with the right approach, you’ll harvest viable seeds without losing your fingers (or your sanity).
Most gardeners actually propagate gladi from corms, but seed-growing purists swear by the challenge—and the unique blooms that result.
First, wait until the pods turn brown and papery before harvesting, usually 4-6 weeks after flowering. Snip them carefully with pruners, then lay them on a tray to dry completely indoors. The real trick? Gently twisting the pods open to release the flat, dark seeds inside—no brute force needed.
A pair of gloves helps, but the struggle is worth it for the satisfaction of growing from seed.
Once dry, store seeds in a cool, dark place for up to a year, though fresh seeds germinate best. Soak them overnight before sowing in well-draining soil at 60°F, and keep them moist but not soggy.
Seedlings take 2-3 months to mature enough for transplanting, but the wait pays off with bold, disease-resistant blooms in their second year.
Here’s the catch: gladiolus seeds are less reliable than corms, with germination rates around 50-70%—but that’s part of the fun. If you’re after guaranteed results, stick to corms. For adventurers, though, seed-grown gladi are a rewarding gamble that yields plants with unexpected colors and vigor. Worth the twist!
📚 In This Guide
- What you need
- Instructions
- Tips and common mistakes
- Wrapping up and next steps
What you need
- ● Mature gladiolus plants: Ensure they’ve completed their blooming cycle (typically late summer to early fall) and show brown, papery seed pods forming.
- ● Pruning shears or sharp scissors: A clean, sterilized pair to avoid spreading disease (1-2 pairs recommended).
- ● Brown paper bags or breathable mesh bags: 4–6 medium-sized bags (12" x 15") for drying and storing pods.
- ● Labeling tags or markers: To tag bags with variety names and harvest dates (e.g., "Dahlia Red," "August 2024").
- ○ Gloves (optional but handy): Lightweight gardening gloves to protect hands from thorns or rough stems.
- ● String or twist ties: For securing bag openings tightly while allowing airflow.
- ● Drying tray or rack: A wire mesh or wooden rack to elevate pods for airflow (or use a clean, dry surface).
- ● Desiccant packets: Place 1–2 in seed bags to prevent moisture buildup during storage.
- ● Fine-mesh sieve or screen: For easily separating seeds from chaff later.
- ● Spray bottle with water: To lightly mist pods if your climate is extremely dry during harvest.
- ● Camera or notebook: To document pod shapes, colors, or abnormalities for future reference.
Step-by-Step guide to harvesting gladiolus seed pods
Here’s how to collect gladiolus seeds effortlessly—no stubborn stems or awkward twisting required.
🌱 Step 1: Identify Mature Seed Pods
Wait until the flower spikes have fully matured and turned brown—this means the pods are ready for harvest. The pods themselves should feel firm and dry to the touch, with no moisture inside. I check by gently squeezing a pod; if it doesn’t crumble or leak, it’s ready. Avoid harvesting too early, as immature pods won’t contain viable seeds.
Look for pods that have turned a papery brown color and appear slightly wrinkled. These are the ones to collect. If you miss the window, pods may split open naturally, scattering seeds—but you’ll still have time to salvage them before they hit the ground. I like to harvest on a dry, sunny morning when the pods are fully dry.
🌿 Step 2: Cut the Entire Spike
Use clean, sharp pruners to cut the entire flower spike about 2-3 inches below the base of the pods. This prevents damaging the plant’s roots or leaving stubs that might rot. I always sterilize my pruners with rubbing alcohol first to avoid introducing bacteria or fungi into the plant.
Place the cut spike in a paper bag or breathable container to allow air circulation. This prevents moisture buildup, which can cause mold or premature seed spoilage. If you’re harvesting multiple spikes, label them with the variety name and date to keep track of your seeds.
💧 Step 3: Dry and Open the Pods
Hang the spikes upside down in a dry, shaded area for 1-2 weeks until the pods are completely dry and brittle. A well-ventilated space like a garage or porch works perfectly. You’ll know they’re ready when the pods rattle loudly when shaken—this means the seeds are loose inside.
Once dry, gently twist each pod open by hand or use a small knife to slit them carefully. Avoid crushing the seeds inside. I like to lay the pods on a clean sheet of paper and tap them lightly with a spoon to release the seeds. Collect the seeds in a small envelope or jar, labeling it with the variety and harvest date.
⏰ Step 4: Store Seeds Properly
Keep the seeds in a cool, dry place—like a sealed envelope in the refrigerator—for up to 2 years. Gladiolus seeds lose viability quickly if stored in warm, humid conditions. I store mine in a small glass jar with a tight lid, tucked away in the fridge’s vegetable drawer.
Before planting, test a few seeds by soaking them overnight in warm water. If they swell and feel firm, they’re still viable. Discard any that remain hard or shriveled. Planting fresh seeds ensures the best germination rates, so I always prioritize using the oldest seeds first.
☀️ Step 5: Plant Seeds for Next Season
Sow gladiolus seeds indoors 8-10 weeks before the last frost date in small pots filled with sterile seed-starting mix. Press the seeds ½ inch deep and keep the soil consistently moist but not soggy. Place the pots in a warm, bright spot with 65-75°F temperatures for optimal germination.
Seedlings may take 2-4 weeks to emerge, so be patient. Once they sprout, provide bright, indirect light until they’re strong enough to transplant outdoors. Harden them off gradually before moving them to the garden, where they’ll need full sun and well-draining soil to thrive.
Tips & tricks for perfect gladiolus seed pod harvesting
These simple strategies will help you avoid common pitfalls and ensure a bountiful seed harvest every time.
Timing is Everything: Harvesting at the right moment is crucial—wait until the pods are completely dry and brown, but before they split open naturally. I've learned the hard way that harvesting too early means immature seeds, while waiting too long risks losing seeds to wind or wildlife. Aim for that perfect papery brown stage when pods rattle when shaken. This window typically opens in late summer to early fall, depending on your climate.
The Technique That Changed Everything: When cutting the spikes in Step 2, make your cuts clean and about 2-3 inches below the pods. This length gives you enough stem to work with while leaving the plant healthy. I've found that sterilizing pruners with rubbing alcohol prevents introducing plant diseases, which is especially important if you're harvesting from multiple plants. Also, use a paper bag for immediate storage—it allows air circulation while protecting seeds from moisture.
Make-Ahead Strategy: You can actually prepare your seed collection up to 2 weeks in advance by hanging the dried spikes in a dry location. This gives you time to process them at your leisure. Just remember to store the seeds properly in a cool, dry place immediately after extraction. I've had great success with this method when I needed to wait for better weather before processing. The key is maintaining that dry environment throughout the entire process.
Pro Tips for Gladiolus Seed Pods
- These simple strategies will help you avoid common pitfalls and ensure a bountiful seed harvest every time.
- Timing is Everything: Harvesting at the right moment is crucial—wait until the pods are completely dry and brown, but...
- The Technique That Changed Everything: When cutting the spikes in Step 2, make your cuts clean and about 2-3 inches b...
Frequently asked questions
Got questions about harvesting gladiolus seed pods? You’re not alone! Here are some of the most common queries—plus quick, stress-free answers to keep your gardening game on point.
1. How do I know when gladiolus seed pods are ready to harvest?
Gladiolus seed pods are ready when they turn light brown and feel dry to the touch (usually 6–8 weeks after flowering). If they’re still green or papery, give them more time. Pro tip: Gently squeeze a pod—if seeds rattle inside, they’re harvest-ready!
2. Do I need to remove the seed pods from the stalk before drying them?
Nope! Leave the pods attached to the stalk until fully dry (1–2 weeks indoors in a dry, shady spot). Once dry, twist or snip them off—no fuss. Warning: If pods split open, collect seeds immediately to avoid scattering.
3. Can I save seeds from store-bought gladiolus flowers?
Probably not. Most commercial gladiolus are hybrids and won’t produce true-to-type seeds. For reliable blooms, save seeds from heirloom or open-pollinated varieties (check plant tags!). Alternative: Swap seeds with fellow gardeners or buy fresh seed stock.
4. Why are my seed pods rotting or moldy?
Overly humid or wet conditions cause rot. Harvest pods before rain, and dry them in a well-ventilated area (like a mesh bag). If mold appears, toss the pods—don’t risk planting contaminated seeds. Fix: Use a fan for faster drying!
5. How long do gladiolus seeds stay viable for planting?
Freshly harvested seeds germinate best, but viability drops after 1–2 years. Store seeds in a cool, dry place (like a sealed jar) to extend shelf life. Test viability: Plant a few seeds—if germination is slow or spotty, refresh your stock.
Wrapping up and next steps
Harvesting gladiolus seed pods doesn’t have to be a tangled mess—with the right tools and timing, you can collect them effortlessly! 🌱 Whether you’re saving seeds for next season or simply tidying up your garden, these pods hold endless potential for future blooms.
Now that you’re armed with pro tips and answers to common questions, it’s time to put your knowledge into action.
Ready to transform your garden into a seed-saving haven? Start by marking your favorite gladiolus plants today—your future garden will thank you! 🌸