
Lawn
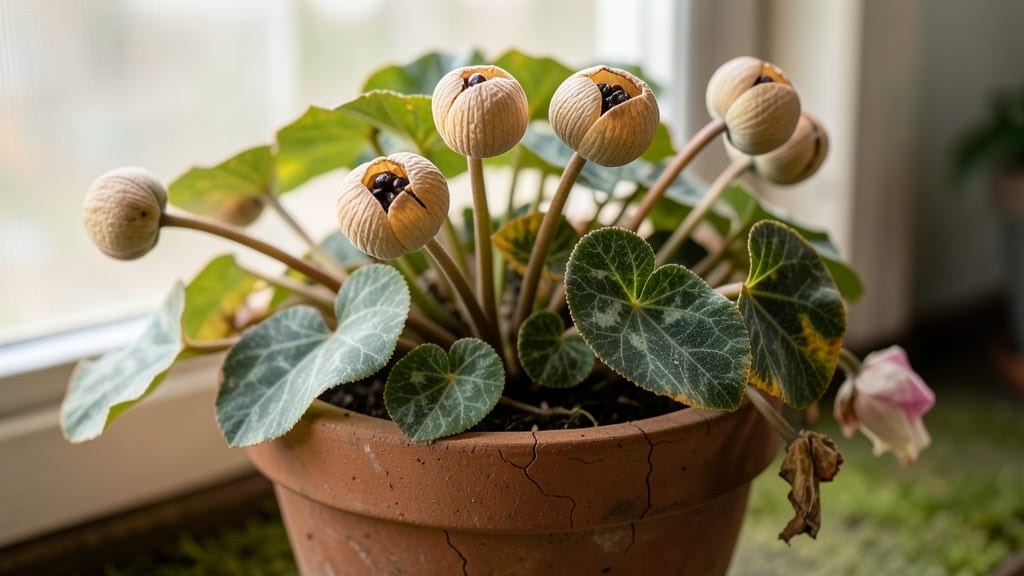
Cracking open cyclamen seed pods reveals tiny treasures that need a little winter magic to sprout. 🌱 I’ve struggled with these finicky seeds until I discovered how cold stratification turns their stubborn dormancy into reliable growth—no more waiting months for inconsistent results.
The secret lies in mimicking nature: after collecting the pods, let them dry completely, then store the seeds in a damp paper towel inside a sealed bag in your fridge for 4-6 weeks.
This chilly treatment tricks the seeds into thinking spring has arrived, breaking their dormancy so they’ll pop up faster and stronger once planted. By the time you move them to soil, you’ll see those first pale green shoots within 2-4 weeks—tiny but determined.
The key is patience and keeping the soil barely moist; cyclamen hate soggy roots but love consistent humidity. Watch them transform from delicate seedlings into lush, flowering plants.
Most gardeners give up here because the seeds take longer than expected, but the payoff is worth it. Once you master this method, you’ll have cyclamen thriving in your garden or containers year after year. The trickiest part? Avoiding overwatering—these plants prefer to stay on the drier side once established.
📚 In This Guide
- What you need
- Instructions
- Tips and common mistakes
- Wrapping up and next steps
What you need
- ● Cyclamen seed pods: 5–10 freshly harvested pods (ensure they’re fully ripe but not dried out).
- ● Seed-starting mix: 1 quart (32 oz) of sterile, well-draining potting soil (e.g., Pro-Mix or coconut coir blend).
- ● Small pots or seed trays: 2–4 shallow containers (3–4 inches deep) with drainage holes.
- ● Plastic zip-top bags: 2–4 resealable bags (quart-sized or larger).
- ● Spray bottle: 1 (for gentle moisture control).
- ● Plastic wrap or clear lid: 1 (to create humidity).
- ● Refrigerator or cold frame: A space to maintain 35–45°F (2–7°C) for stratification.
- ● Labeling tags: 2–4 (to track seed pods and dates).
- ● Heating mat: 1 (to warm soil post-stratification, if indoor growing).
- ● Grow lights: 1–2 LED bulbs (for 12–14 hours of light/day after sprouting).
- ● Humidity dome: 1 (to retain moisture during germination).
- ● Fungicide: 1 tsp diluted neem oil or hydrogen peroxide (3% solution) for prevention.
- ● Notebook: 1 (to log stratification progress and sprouting dates).
Instructions for cold stratifying cyclamen seed pods
Here's the foolproof method I use to break cyclamen's stubborn dormancy and get reliable sprouts every time.
🌱 Step 1: Harvest and Prepare the Seed Pods
Collect mature cyclamen seed pods when they turn from green to brown and begin splitting open naturally. I like to harvest them in late summer when they're fully dry but haven't yet released seeds. Use clean scissors to snip the pods from the stem, leaving about 1 inch of stem attached.
Spread the pods on a paper towel to air-dry completely for 3-4 days in a warm, dry place. This prevents mold from developing during stratification. Once completely dry, you'll see the pods crack open slightly—this is when they're ready for the cold treatment. Don't rush this step; damp pods will rot during stratification.
❄️ Step 2: Perform Cold Stratification
Place the dried seed pods in a sealed plastic bag with a small amount of moistened peat moss or vermiculite—just enough to create humidity but not soak the pods. I use a quart-sized ziplock bag and add about 2 tablespoons of moistened peat. Seal the bag tightly and place it in your refrigerator.
Store the pods at 35-40°F for 8-12 weeks. This mimics winter conditions and breaks the seed's dormancy. Check the pods monthly to ensure they're not drying out or developing mold. If you see condensation inside the bag, open it for 10 minutes to air out before resealing.
☀️ Step 3: Germinate the Seeds
After stratification, remove the pods from the refrigerator and carefully open them to extract the seeds. You'll notice the seeds have softened slightly—this is your signal they're ready to germinate. Fill small seed trays with a mix of 50% peat moss and 50% perlite to ensure good drainage.
Sow the seeds 1/8 inch deep and cover lightly with the same mix. Mist the surface gently with water until evenly moist but not soggy. Place the trays under a grow light or in a bright, indirect window. Keep the soil consistently moist—never soggy—during germination. You should see sprouts in 4-8 weeks, though some may take longer.
🌿 Step 4: Transplant and Care for Seedlings
Once seedlings develop their first true leaves and reach about 2 inches tall, it's time to transplant. Gently remove them from the seed tray, being careful not to damage the delicate roots. I use small 3-inch pots filled with a mix of 1 part peat moss, 1 part perlite, and 1 part potting soil.
Plant each seedling about 1 inch deep and water lightly to settle the soil. Place the pots in bright, indirect light and maintain 65-70°F temperatures. Avoid direct sunlight at first—it can scorch young cyclamen leaves. After 2 weeks, you can gradually introduce them to more sunlight.
⏰ Step 5: Maintain Through First Season
Keep the soil consistently moist but never waterlogged. Cyclamen roots are sensitive to rot, so I water from the bottom by placing pots in a tray of water for 10 minutes, then letting them drain completely. Fertilize lightly every 4 weeks with a diluted houseplant fertilizer during the growing season.
Watch for signs of overwatering—yellowing leaves or mushy stems mean you're watering too much. If you see this, reduce watering and improve drainage immediately. With proper care, your cyclamen seedlings will develop into beautiful plants ready for their first bloom in about 12-18 months.
Tips & tricks for perfect cyclamen seed pod stratification
These little-known details make all the difference when breaking cyclamen's dormancy—trust me, I've learned them the hard way!
Harvest Timing Matters: The key to successful stratification starts with harvesting pods when they're fully brown but haven't yet released seeds. I've found late summer is ideal—this gives you enough time for the full 8-12 week cold treatment before spring planting. If you harvest too early (when still green), the seeds won't be fully mature and may not germinate properly. Look for pods that have started cracking open naturally—this is your perfect window.
Drying is Non-Negotiable: That 3-4 day drying period in Step 1 isn't just about preventing mold—it's about conditioning the pods for stratification. I learned this after losing two batches to rot because I rushed the drying process. Spread them on a single layer of paper towel in a warm, dry spot (like on top of your fridge) and check daily. The pods should feel completely dry to the touch, with no moisture when you gently squeeze them. This step prevents mold development during the cold treatment.
Stratification Temperature Secrets: Your refrigerator's crisper drawer is actually the perfect spot for this process—it maintains that crucial 35-40°F range without fluctuations. I've found that placing the sealed bag on a shelf near the back (where it's coldest) gives the most consistent results. The monthly checks are important too—open the bag and feel the pods. If they feel damp or you see any condensation, that means too much moisture is trapped, which can lead to mold. A quick 10-minute air break solves this instantly.
Germination Lighting Hack: While bright indirect light works, I've had the best success with a simple LED grow light placed just 6 inches above the seed trays. These inexpensive lights provide the full spectrum needed for germination without the heat of sunlight. If you don't have a grow light, position your trays near an east-facing window where they'll get gentle morning light. The key is avoiding direct midday sun—cyclamen seedlings can get scorched easily.
Pro Tips for Cyclamen Seed Pods
- These little-known details make all the difference when breaking cyclamen's dormancy—trust me, I've learned them the ...
- Harvest Timing Matters: The key to successful stratification starts with harvesting pods when they're fully brown but...
- Drying is Non-Negotiable: That 3-4 day drying period in Step 1 isn't just about preventing mold—it's about conditioni...
Frequently asked questions
Got questions about growing cyclamen from seed pods?
You’re not alone! Here are answers to the most common queries to help you succeed—no guesswork needed.
How long does cold stratification take for cyclamen seed pods?
Cold stratification typically requires 4–8 weeks in the fridge. Place moistened seed pods in a sealed bag with damp peat moss or paper towels, then store them at 35–40°F (2–4°C). Patience is key—some seeds may sprout faster, while others need the full timeline. Monitor for softening or cracks, which signal readiness to plant!
What if my cyclamen seed pods won’t sprout after stratification?
Don’t panic! Try these fixes:
- Check moisture: Overly dry or soggy pods can fail. Aim for consistently damp (not wet) conditions.
- Test viability: Squeeze gently—hard pods may still hold life. Cut open a few to peek for plump seeds.
- Extend stratification: Add 2–4 more weeks if pods are still firm.
- Try warmth: After stratification, move pods to 65–70°F (18–21°C) to encourage germination.
How soon will cyclamen seedlings emerge after planting?
Seedlings usually appear 2–6 weeks after planting stratified pods in well-draining soil. Keep the mix moist but not waterlogged, and place the pot in bright, indirect light. Thin seedlings to 2 inches apart once they have 2–3 leaves to prevent overcrowding.
Can I grow cyclamen from seed pods indoors year-round?
Yes! Cyclamen thrive indoors with the right setup:
- Light: Use a grow light for 12–14 hours daily if natural light is weak.
- Temperature: Maintain 60–70°F (15–21°C) day/night.
- Humidity: Mist seedlings lightly or use a humidity tray to mimic their native woodland habitat.
- Potting mix: Opt for a peat-free, well-aerated blend to prevent rot.
What’s a quick alternative if I don’t want to deal with seed pods?
If cold stratification feels like too much work, consider:
- Division: Split mature cyclamen tubers in early spring for instant plants.
- Tissue culture: Buy pre-sprouted cyclamen from specialty nurseries (guaranteed disease-free!).
- Cuttings: Leaf cuttings (though less reliable) can root in perlite under humidity.
Wrapping up and next steps
Growing cyclamen from seed pods is a rewarding journey that unlocks vibrant blooms and lush foliage—but only with patience and the right techniques. By mastering cold stratification, you’ve unlocked a foolproof way to coax those tiny seeds into thriving plants.
Now that you’re equipped with the know-how, why not take the next step?
Start small: try a few seed pods this season, experiment with timing, and soon you’ll have a green thumb’s dream—a thriving cyclamen collection! 🌱✨
- Next up: Share your progress or ask questions in gardening forums!
- Pro tip: Document your stratification process for future reference.